


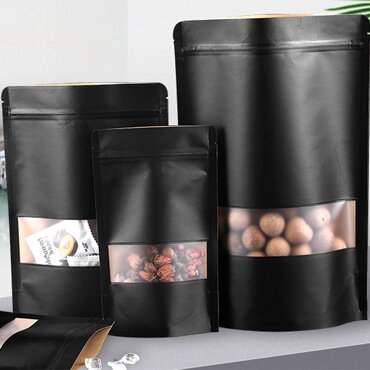
A clear window can improve a kraft pouch design, but poor sizing or placement can hide the product, weaken the layout, and complicate production approval.
Buyers should size and position a clear window only after confirming the filled product level, pouch folds, zipper, seals, artwork, and display angle. We recommend approving a dimensioned dieline and a filled sample instead of choosing the window from an empty mock-up alone.
At XINYUAN, we use the following four questions to turn a visual idea into a window specification that purchasing, design, production, and quality teams can all review.
What should the clear window show to the shopper?
A window without a clear purpose can reveal empty space, crumbs, or an uneven fill instead of the product feature that helps the package sell.
The window should show a recognizable, attractive part of the real product at the expected fill level and shelf position. Buyers should define the viewing purpose before choosing its shape, size, or location.

Start with the viewing purpose
We first ask what the buyer wants a shopper to learn through the window. A clear view may communicate product color, piece size, texture, mix variety, or approximate remaining quantity. Those goals need different viewing areas. A narrow window can show product level, while a broader window may show several pieces. The package should not use a window simply because competing products have one.
The product itself also changes the decision. Small particles can settle differently from large pieces. A powder may leave dust on the inside surface. An irregular product may create large gaps. An oily product may change how the viewing area looks over time. We ask buyers to review the actual product rather than approve the window with a clean digital rendering.
The viewing angle matters too. A pouch may face forward on a shelf, lean in a carton, hang from a display, or sit below the shopper's eye level. Buyers should photograph a filled mock-up from the likely shopping angle. That simple step can show whether the window presents the product or mostly shows headspace.
| Window objective | What the buyer should inspect | Useful approval input |
|---|---|---|
| Show product texture | Is the visible area large enough to recognize the product? | Filled front-view photo |
| Show product level | Does the window cross the normal fill line? | Minimum and maximum fill examples |
| Show mixed contents | Are representative pieces visible after settling? | Actual product sample |
| Support shelf comparison | Can shoppers see the product from the display angle? | Shelf or carton mock-up |
Our kraft paper stand-up pouch page provides a relevant format reference. However, the window brief should describe what the shopper must see, not only the desired outline.
How large should the window be on the front panel?
An oversized window can dominate the brand panel, while a tiny window may show too little product to justify the added design and approval work.
The right window size balances product visibility with space for branding, required copy, seals, folds, and visual structure. Buyers should compare several scaled options on the final pouch dieline and filled mock-up.
Size the window inside the usable panel
We do not treat the full pouch width and height as printable, visible space. The top seal, zipper area, side seals, bottom gusset, folds, and curved pouch shape reduce the usable front panel. The window must fit inside that real panel while leaving enough surrounding material for a balanced design and practical production review.
Buyers should begin with the finished pouch dimensions and expected fill volume. Next, they should mark the fill line, headspace, zipper, tear opening, seals, gusset fold, and critical artwork. Only then should the designer explore window sizes. This sequence prevents a visually attractive concept from occupying space needed by another function.
We recommend comparing at least a smaller, medium, and larger window on the same dieline. The team can print each version at actual size, place it over a filled sample, and inspect it from normal viewing distance. The chosen option should still work when the product settles lower than expected. It should also leave a clear location for the brand name, product name, and other required information chosen by the buyer.
| Size decision | Too little space may cause | Too much space may cause |
|---|---|---|
| Visible product area | An unclear product view | A weakened brand panel |
| Space above fill line | The window may appear empty | Useful artwork space may be lost |
| Space around the window | The shape may feel crowded | The window may overpower the layout |
| Remaining copy area | Important information may become cramped | The design may feel visually unbalanced |
We provide free artwork and typesetting service. That support works best after the buyer confirms the pouch dimensions, expected fill, required copy, and window objective, because each element can then be placed on one controlled dieline.
Where should the window sit relative to the zipper, seals, and gusset?
A well-sized window can still fail visually when a zipper crosses it, a fold hides it, or the product settles below it after handling.
The window should stay clear of functional zones and remain visible on the formed, filled pouch. Buyers must review its distance from the zipper, seals, folds, gusset, and cut edges.
Review the formed pouch, not only the flat artwork
A flat dieline does not look exactly like a filled stand-up pouch. The bottom gusset opens, the front panel curves, and the side areas may turn away from direct view. A window placed too close to those changing areas can look narrower or lower after filling. We therefore ask buyers to evaluate the formed shape alongside the flat drawing.
The opening sequence must also remain clear. The zipper, tear notch, top seal, and consumer grip area need their own space. The window should not make the top section visually confusing or leave too little room for instructions. At the bottom, the buyer should check the gusset fold and the way the product settles. A low window may be partly hidden by the shelf angle or case lip.
Custom shapes need special care. A curve, circle, or product-shaped outline can support the artwork, but narrow points and tight details may not translate well into the final visual result. We prefer to review the exact shape with production before the buyer treats it as final. The approved document should identify the window outline, position, orientation, and relationship to all pouch features.
| Placement zone | Question to answer | Evidence to approve |
|---|---|---|
| Below the zipper | Is there enough separation for opening and reclosure? | Dimensioned dieline |
| Near side seals | Will the formed curve reduce the visible area? | Filled front and side photos |
| Above the gusset | Will the opened gusset or settled product change the view? | Filled standing sample |
| Near artwork | Do the window and key graphics remain distinct? | Actual-size printed proof |
A clear placement record helps our production team connect artwork, window, pouch-making, and inspection requirements. Our integrated production system covers raw-material production through finished products, so we focus on keeping those linked requirements visible throughout the order.
What should buyers approve before bulk production begins?
A screen proof can confirm layout, but it cannot show every effect of filling, forming, product settling, and physical handling. Buyers need a controlled approval sequence.
Before bulk production, buyers should approve the dimensioned dieline, window shape and position, artwork proof, physical construction, filled appearance, and acceptance record for the final sample version.

Separate visual approval from functional approval
We suggest using free in-stock samples first when they can help the buyer compare kraft appearance, general pouch format, zipper use, and available window concepts. An in-stock sample does not automatically prove the final size, material structure, artwork, window position, or performance with the buyer's product. The approval record should state what each sample actually confirms.
A separately produced custom sample may require a sample fee. For a later bulk order, we can return the fee or deduct it from the bulk-order price, subject to the confirmed quotation. A printed pattern also requires a printing plate, so a plate fee may apply. The plate fee is paid to the plate-making factory. If the same printing pattern is reused later, a new plate fee is normally not needed. Buyers should confirm these points in the quotation before approving paid sampling.
The final review should use representative product and fill quantity. The team should inspect the pouch upright, packed in its sales carton, and after normal handling. Purchasing should keep the signed dieline, artwork version, sample identifier, comments, and approval date together. If the window, pouch size, fill level, or artwork changes, the affected review should be repeated.
| Approval item | What it confirms | What it does not confirm alone |
|---|---|---|
| Dimensioned dieline | Window location and relation to features | Filled shelf appearance |
| Artwork proof | Graphic placement and version | Physical pouch behavior |
| Empty physical sample | Construction and basic window execution | Product settling and viewing angle |
| Filled sample | Real product visibility and formed shape | Every future product variation |
Buyers can send the pouch dimensions, product description, expected fill, artwork, preferred window concept, order quantity, and sample goal through our contact page. A complete brief lets us review the project without guessing at critical details.
Conclusion
Size and position a kraft pouch window by testing real product visibility against the usable panel, functional zones, artwork, and a documented filled-sample approval.